Clipping Planes
This tutorial shows how to use clipping planes to control the regions where objects are rendered.
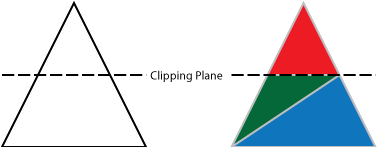
Clipping planes are a simple graphics technique that allow the application to limit where triangles are drawn. Once a clipping plane is configured and enabled, any triangle that spans the plane is clipped, i.e. it is subdivided so that the resulting geometry forms a straight edge along the clipping plane. Depending on the direction the clipping plane is facing, one of the two resulting parts will be discarded.
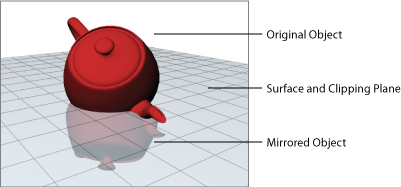
Clipping planes are useful for achieving a variety of graphical effects. One example is reflection, where a mirrored version of a scene is drawn beneath a shiny surface. A clipping plane, placed so that it coincides with the reflective surface, can be used to clip the original object so that it does not protrude below, and also the mirrored object so that it does not protrude above the surface.
A Clipping Box
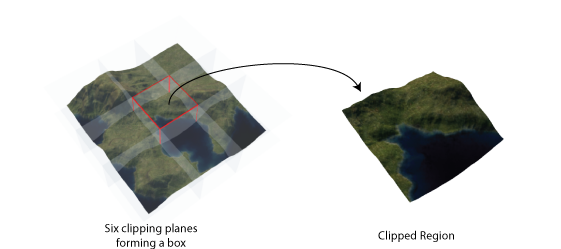
By placing six clipping planes together, we can construct a box that clips anything outside its walls, thus constraining the rendering of a scene to the bounds of the box. In augmented reality applications this can be a useful technique for reducing information overload. For example, placing a very large object on a marker might take up almost all of the user’s field of view, blocking their view of the real world around them. By placing the object within a clipping box, a portion of the object will be visible while the rest is hidden. The user could be provided with a way to toggle the clipping box feature, or to adjust which part of the larger model is positioned in the visible region.
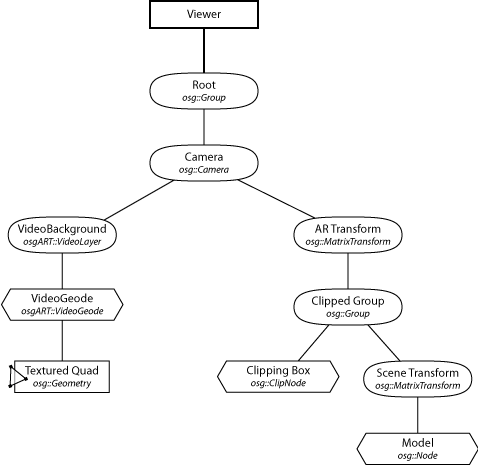
Implementation in osgART
Open Scene Graph includes a class,
osg::ref_ptr<osg::MatrixTransform> arTransform = new osg::MatrixTransform();
osgART::attachDefaultEventCallbacks(arTransform.get(), marker);

scene = new osg::MatrixTransform();
scene->addChild(osgDB::readNodeFile("media/terrain.ive"));

osg::Group* clippedGroup = new osg::Group;
osg::MatrixTransform* transform= new osg::MatrixTransform;
clipNode = new osg::ClipNode;
osg::BoundingBox bb(-40,-40,0,40,40,132);
clipNode->createClipBox(bb);
clipNode->setCullingActive(false);
transform->addChild(clipNode.get());

clippedGroup->addChild(transform);
clippedGroup->addChild(scene.get());

arTransform->addChild(clippedGroup);
The scene group is a transform so we can move it around. In this case, we will use key events to move the scene, but it could be done in any number of ways. Because the clipping box remains stationary, as the scene moves the content visible in the box changes. We therefore have a small “window” into the larger scene, as shown in the screenshots below: